You've got your own space, the furniture is in, and you even have a few accessories. Yet, there is something missing. The space still feels empty for some reason.
Your problem is most likely a lack of artwork on the walls. No matter how filled a space is on the floor, it can still feel empty if the walls are empty. This is especially true the taller your ceilings get. But where do you start you ask? That's exactly what we're going to talk about today. We're going to take a look at different ways to fill up your walls with artwork and the best ways to plan it out.There are a couple different ways you can go about displaying artwork or photography. Listed below are a few examples of artwork displays and how they might work in your space.
GALLERY LAYOUT
A gallery layout gives emphasis to each piece of artwork. They are usually not grouped together but instead left to stand alone. Each piece is spaced at least one frame width away from the next piece. Gallery layouts are also hung so that the center of each piece is at eye level. This is usually around 63-66" from the ground, but is of course not possible to be exact for everyone. Eye level is of course a guideline. Certain situations may guide you in a different direction. For example, when hanging a tall vertical piece, it might be best to hang the piece a bit lower so that the top third of the artwork is at eye level.
SYMMETRICAL LAYOUT
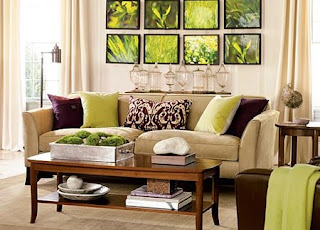
 Symmetrical layouts are great for people that like order. They help to give spaces a sense of calm and tidiness. When working with a symmetrical layout the frames should all be the same type (*see below for exception) , the subject matter should be somewhat similar or have a theme, and the artwork should be hung straight and level. This type of layout takes the most time to hang due to all the measuring. The frames do not need to be all the same size or type as long as the layout is mirrored on both sides (In other words if you put a 5x7 on the bottom left of the wall then you would put a 5x7 on the bottom right of the wall. And if you put a black frame on the top left of the wall then you would put a black frame on the top right of the wall).
ASYMMETRICAL LAYOUT
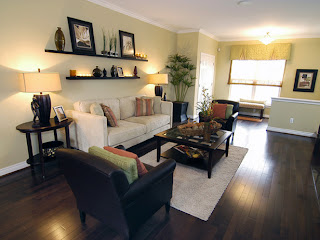
Asymmetrical layouts are freer flowing and are great to add interest to a space. These are great if you plan on building upon them, but they can also be the most difficult to keep in balance with the space. Different frames, themes, and even mediums (photography, paintings, etc.) can be used as long as they stay in balance. As an example, if you have three small white frames on the left, try and put one large white frame on the right to balance it out. Another great feature of the asymmetrical layout is that they are easier to hang. The pictures do not need to line up exactly so there is a lot less measuring involved.
General Artwork Layout Tips
- Keep the size of the artwork in proportion to the wall space. Small pieces on small walls, large pieces on large walls, tall skinny pieces on tall skinny walls, etc.
- If artwork is hung above a piece of furniture make sure that the artwork is not longer than the width of the furniture. As a general rule you should keep the artwork width (or limits in the case of a grouping) to 75% of the furniture's width.
- If artwork is hung above a piece of furniture such as a sofa, credenza, headboard, or dresser, hang them such that the bottom of the artwork or group of artwork is approximately 6-12 inches above the piece of furniture.
- If possible try to illuminate your artwork. This can be done with track lighting, directional can lighting, or wall arc lighting.
- When selecting artwork look to the space you are going to put it in for inspiration. A piece of artwork should complement the space that it is in. Neutral colors will give a calm effect while bold colors will make a statement.
- One large piece will call more attention to itself than several smaller ones covering the same amount of space. For areas that you want to call attention to such as above a fireplace, use one large dynamic piece.
- Horizontal lines in artwork or artwork hung in a horizontal formation will tend to make the space look wider and gives a more casual and calm atmosphere to a space.
- Vertical lines in artwork or artwork hung in a vertical formation will tend to make the space look taller and gives a more elegant and dynamic atmosphere to a space.
- Make sure that your hanging hardware is secure enough for the artwork that you are hanging. Always check the weight limits before selecting your hardware. Hardware boxes will usually state their weight limits.
- Artwork framed or matted in a contrasting color to the wall will stand out more than one that is framed and matted in a color that is similar to the wall color.
- A fun way to make small artwork look larger is to create a larger frame around a small piece of artwork with picture molding. Attach the picture molding to the wall and hang the piece of artwork in the center of it.
GETTING STARTED
Step 1: Select what type of layout you are going to do (Gallery, Symmetrical, or Asymmetrical).
Step 2: Work with the layout on a table or on the floor until you are happy with the end result.
 If possible lay a large sheet of paper down first so that you can trace each frame in its final position. This will save you time when it comes to measuring. All you will have to do is tape the paper on the wall (painter's blue tape works best), poke a nail hole where the hangers will go (*Make sure to measure and mark this on the paper before you put it on the wall. See step 3 for how to do this.), and remove the paper from the wall.
 If you do not have a sheet of paper large enough for the entire ensemble then you can trace each frame on newspaper and cut them out to size. This will give you the ability to tape each paper on the wall to confirm the layout. You then will hang your hardware over each piece of paper (*make sure to measure and mark this on the paper before you put it on the wall. See step 3 for how to do this.), then pull the paper off the wall.
A third more technical option would be to take a photo of the wall you need to place artwork on. Upload the image onto your computer and use the editing tools to draw rectangles where you might like your artwork to go.
Step: 3 After you have your layout figured out it's now time to hang your artwork. If you've made templates in step 2 then this will be quite easy as described above. Remember when hanging multiple pieces of artwork that picture hangers are not always located at exactly the same location on each frame so it's always best to measure out each one. You can do this by measuring from the top of the frame to the picture hanger and also measuring from one side of the frame to the picture hanger. This will give you your exact picture hanger location. This is essential for a symmetrical artwork grouping layout. After you've hung your first piece of artwork, measure the distance to your next piece (a good distance between frames is approximately 3 - 12 inches depending on the size of the piece). Lightly mark on the wall where the top of your frame should be. Measure down from that point to where your picture hanger should be. If needed check your measurement for the horizontal placement of your picture hanger. This especially needed if you are doing a vertical grouping so that all frames line up or if you are marking on a paper template. Remember if you are marking on a template that your measurements will be opposite so either account for that or turn your paper over before placing on the wall. Once you have your exact picture hanging location place your hanger and hang your artwork.
Step 4: Use a level and make sure all of your artwork is level. Next, use artwork putty, artwork rubber glides, or double faced foam tape on the back of the artwork at the bottom to keep your piece from shifting. Putty and glides are less permanent while double faced tape is permanent but very secure.
Step 5: Step back and admire your work. You deserve it!
***Remember, these are just guidelines. They are by no means the absolute rules. In the end rely on what makes you feel good. That's the best piece of advice I can give you.


1 comment:
Excellent advice. Excellent post.
Post a Comment